HTTP
Overview
The HTTP Event Action allows ANSVIS to send AI task event data to an external system via an HTTP POST request. This action is configured per AI task and is triggered automatically when the AI task generates an event (e.g., detection, counting, recognition, etc.).
- Send event result to CMS / MES
- Notify central monitoring server
- Push AI metadata to analytics platform
- Integrate with third-party automation
Target Server

URL: The endpoint that will receive the event data.
https://yourserver.com/api/event/receive
Method: All event data is sent in the POST request body.
POST
Media Options (optional)
ANSVIS can attach event-related media to the HTTP request.

Append Video
To use this feature, Cloud storage must be configured in system settings.
- A short video clip is generated from camera frames around the event time.
- The video is uploaded to the configured cloud storage.
- The HTTP request includes a URL pointing to the uploaded video.
- The
Video Configurationsdialog allows users to configure video display setting
Append Image
Image Size selection:
- Cloud Image Storage: Image is uploaded to cloud storage and the POST request includes the image URL.
- Base64 format: Image is converted to Base64 format with selected resolution and Base64 image is included directly in the POST body.
Add Object Overlays to Images If enabled, the bounding boxes and detection labels are drawn on the image before sending. User can disable it if they want to handle the overlay from the external system using the event data.
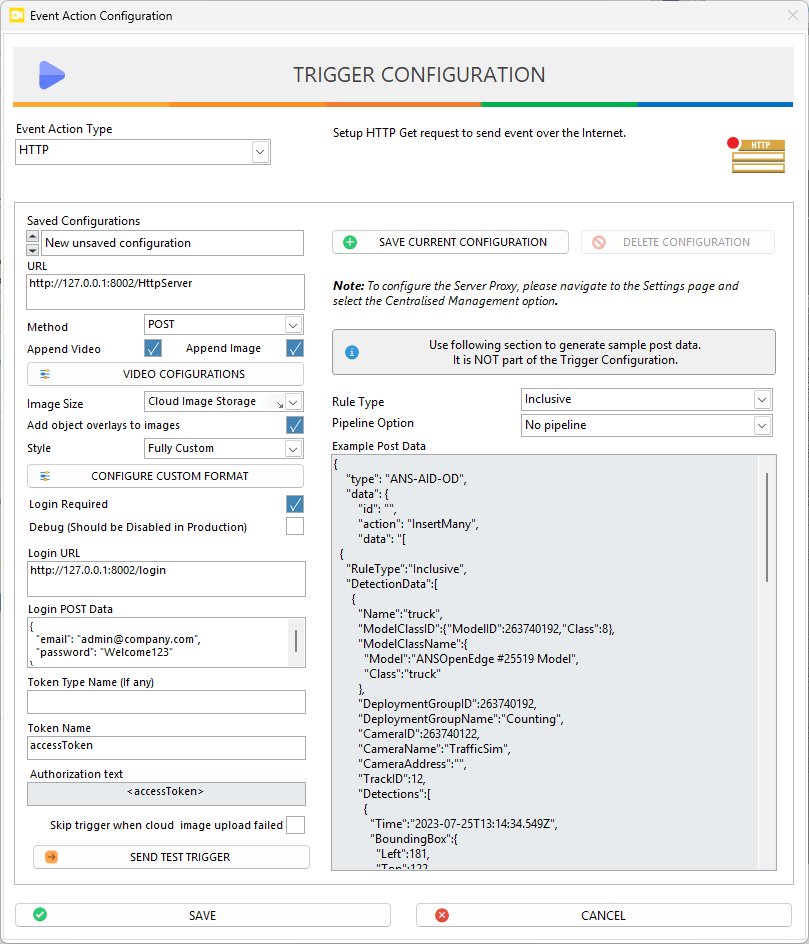
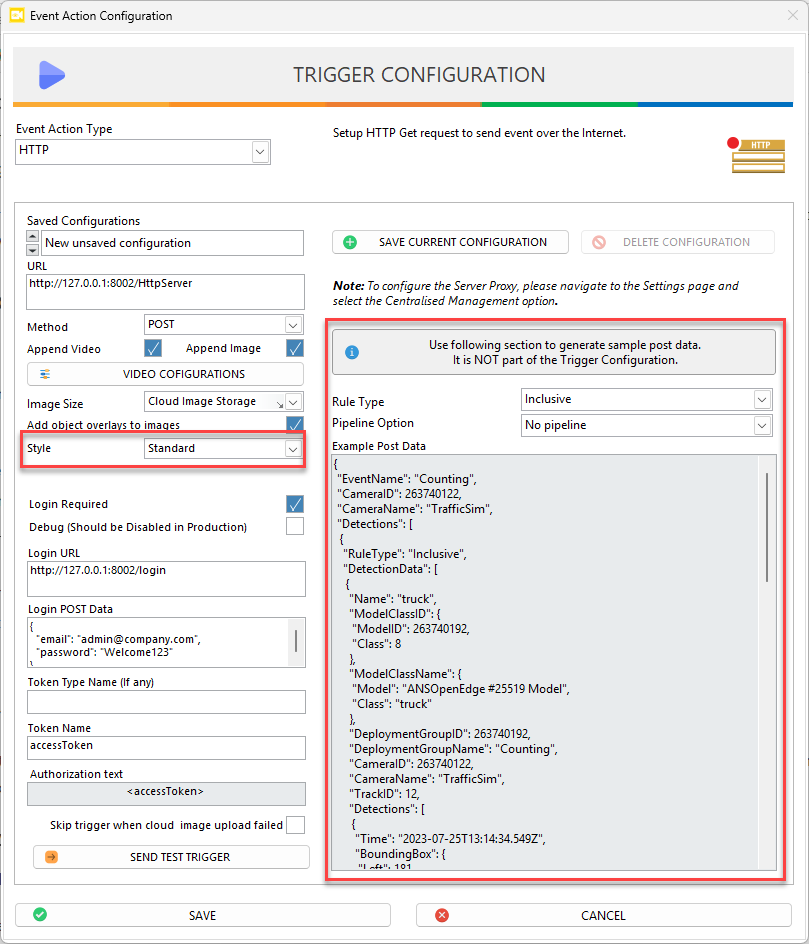
Payload Format (Style)
The Style option defines the structure of the HTTP POST body.
- Standard
- Standard-Verbose
- Custom Event Data
- Serialized Custom Format
- PLC Server
- Fully Custom
- Fully Serialized Custom
Standard Style
Uses the predefined ANSVIS event data structure.
You can refer to the Example Post Data on the right-side panel for standard style data (JSON structure). Each rule type and pipeline option will have different example.
Custom Style
Allows users to define a custom JSON structure.
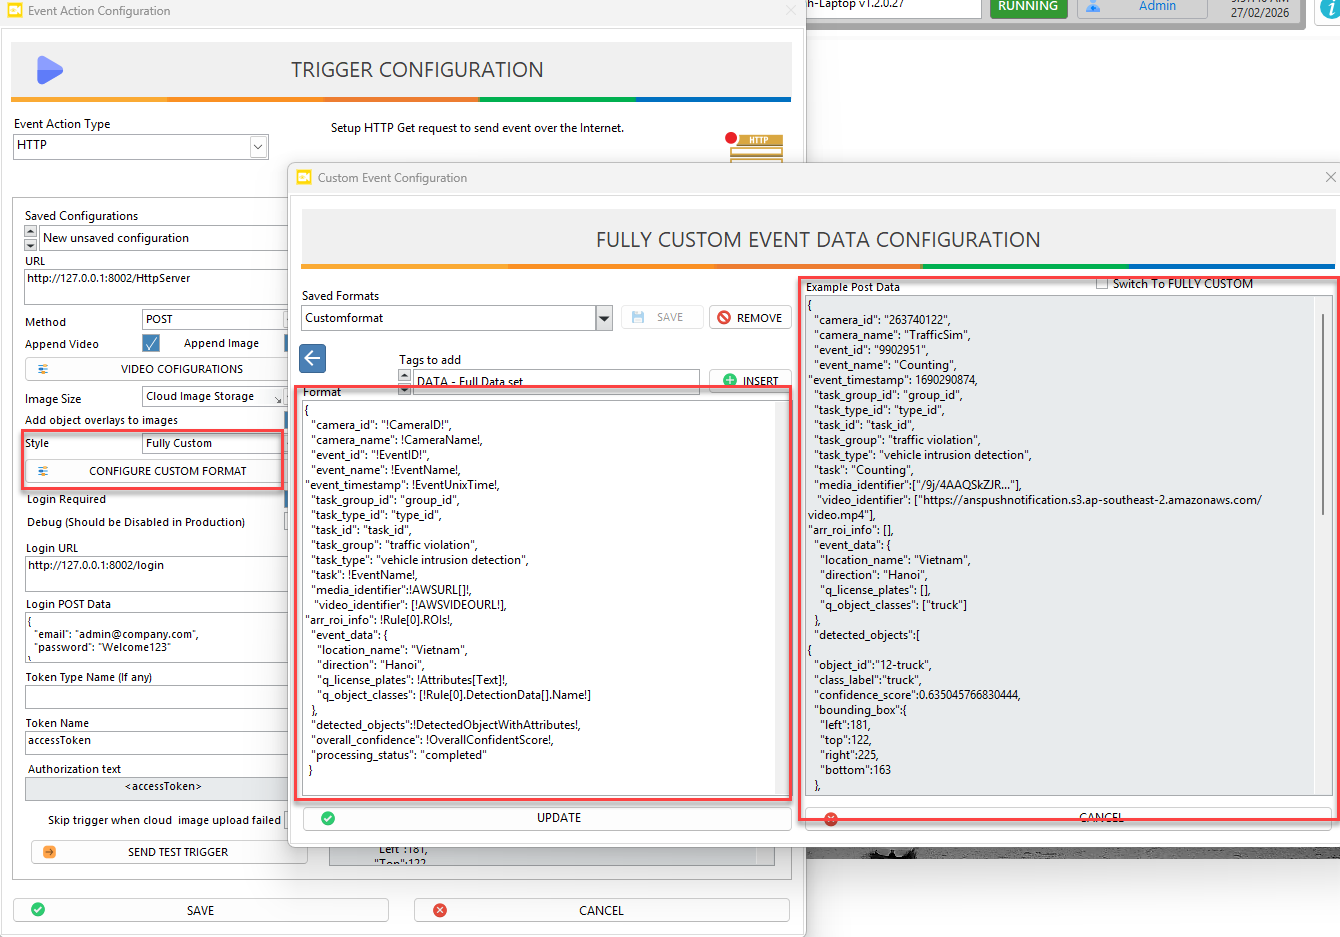
Users can use the Configure Custom Format dialog to design the request body, including:
- Insert dynamic variables to automatically replaced with actual values (e.g., camera ID, event name, confidence score) when the event occurs.
- Rename fields
- Control data hierarchy
- Match external system format requirements
ANSVIS supports dynamic variables using the following syntax: !VariableName!. These variables are replaced with actual values when the event is triggered.
- Wrap variables with
! !when using them in payload - Use quotation marks
" "if the expected value is a string (Some variables are automatically formatted as string by ANSVIS) - Do not use quotation marks for numeric values
- Refer to the Example Output Preview to verify final JSON formatting before deployment.
Core Event Variables
| Variable | Type | Description | Availability |
|---|---|---|---|
EventID | Integer | Unique identifier of the event | Always |
EventName | String | Name of the triggered event | Always |
EventTime | String (ISO 8601) | Event timestamp in readable format | Always |
EventUnixTime | Integer | Event timestamp in Unix format | Always |
DGID | Integer | Task group ID | System dependent |
i | Integer | Internal event index or sequence counter | System dependent |
Camera Variables
| Variable | Type | Description | Availability |
|---|---|---|---|
CameraID | Integer | Unique camera identifier | Always |
CameraName | String | Camera display name | Always |
Media Variables
These variables are available when image or video attachment is enabled.
| Variable | Type | Description | Availability |
|---|---|---|---|
IMAGE | Array[String] | Standard event image structure | When Base64 mode enabled |
AWSURL[] | Array[String] | Uploaded image URLs | When cloud upload enabled |
AWSVIDEOURL | String | Uploaded event video URL | When cloud upload enabled |
AI Result Variables
| Variable | Type | Description | Availability |
|---|---|---|---|
OverallConfidentScore | Float | Overall confidence score of the event | AI Task |
DetectedObjectWithAttributes | Object | Full detection result with associated attributes | AI Task |
DATA | Object | Standard detection result structure | AI Task |
DDATA | Object | Detailed detection data structure | AI Task |
ALPRDATA | Object | Standard License Plate Recognition result structure | ALPR Task |
Rule[0].ROIs | Object | Coordinate of Region of Interest if exists | |
Rule[0].DetectionData[0].Detections[0].BoundingBox | Float | Coordinate of detected object's bounding box | |
Rule[0].DetectionData[].Name | String | Class name of detected object | |
Attribute[<Key>] | String | Extracted attribute text | When attribute exists |
Attributes[<Key>] | Array[String] | List of extracted attribute key | When multiple attributes exist |
- The Rule[...] variable are the one that uses a JSON query of the data.
[0]specifies a specific item in an array.- Empty brackets [] indicate all elements in the array.
<Key>must be replaced with the actual attribute name from JSON data, example:Text: License plate numbercolor: License Plate ColorGender: Face gender
JSON data format:
{
  "EventName":"Vehicle Intrusion",
  "Detections":[
    {
      "RuleType":"Stable Object Appearing",
      "DetectionData":[
        {
          "Name":"motorbike",
          "ModelClassID":{"ModelID":785800007,"Class":2},
          "ModelClassName":{
            "Model":"B-IN_ANS_VehicleDetection(GPU) v1.0",
            "Class":"motorbike"
          },
          "DeploymentGroupID":1992040219,
          "DeploymentGroupName":"Vehicle Intrusion",
          "CameraID":1992040208,
          "CameraName":"Road",
          "CameraAddress":"BS_263_Daytime_1.mp4",
          "TrackID":1,
          "Detections":[
            {
              "Time":"2026-03-03T15:26:25.431Z",
              "BoundingBox":{
                "Left":1450,
                "Top":450,
                "Right":1655,
                "Bottom":797
              },
              "Score":0.871037,
              "Image":10,
              "ModelClassID":{"ModelID":785800007,"Class":2},
              "ModelClassName":{
                "Model":"B-IN_ANS_VehicleDetection(GPU) v1.0",
                "Class":"motorbike"
              },
              "ExtraInformation":"",
              "Attributes":[
                {
                  "Key":"Location",
                  "Value":"[1561,643,1610,680]"
                },
                {"Key":"Score","Value":"0.94"},
                {"Key":"Text","Value":"67B277363"},
                {"Key":"color","Value":"white"}
              ]
            }
          ],
          "Result":"5",
          "ExtraVisionResult":"",
          "TriggeredGroup":"",
          "UserInfo":{
            "UserID":"",
            "UserName":"",
            "GroupIDs":[],
            "GroupNames":[]
          },
          "Attributes":[
            [
              "ALPR",
              [
                ["Location","[0.09,0.11,0.57,0.32]"],
                ["Score","0.94"],
                ["Text","67B277363"],
                ["color","white"]
              ]
            ]
          ]
        }
      ],
      "PipelineOption":"ALPR pipeline",
      "ROIs":[
        {
          "ROIMatch":"Centre Point",
          "ROIPoints":[
            {"x":199,"y":515},
            {"x":573,"y":84},
            {"x":1743,"y":262},
            {"x":1698,"y":962},
            {"x":199,"y":990}
          ],
          "Option":"Inside ROI",
          "Name":"Rule 1",
          "OriginalImageSize":2546,
          "CustomModelROI":false,
          "RoiType":"Generic",
          "LineGap":0
        }
      ]
    }
  ],
  "Images":[
    {
      "ID":10,
      "Image":"20260303_220000/10.jpg",
      "ScaledFactor":1
    }
  ],
  "Video":"Video_20260303_222625.mp4"
}
Authentication (Optional)
If the external API requires authentication, enable Login Required.

ANSVIS will:
- Send a login request to the configured Login URL.
- Use the provided Login POST Data.
- Extract the token from the login response.
- Attach the token to the HTTP event request.
Login URL: The authentication endpoint of the external system.
https://yourserver.com/api/login
Login POST Data: JSON data required by the authentication API.
{
  "username": "your_user",
  "password": "your_password"
}
Token Type Name: Defines how the token is attached in the Authorization header.
Bearer //Example
Token Name: The field name in the login response containing the token.
accessToken //Example
Skip Trigger When Cloud Image Upload Failed
![]()
This option controls whether the HTTP event is sent using an Asynchronous (Async) or Synchronous (Sync) execution model when cloud media upload is enabled.
Disabled (Default)
Use this mode when real-time event delivery is more important than guaranteed media availability.
- Execution Model: Asynchronous Mode (Async)
- HTTP event is sent immediately after the AI event occurs.
- Media upload runs in parallel.
- Even if media upload fails, the HTTP request is still sent.
Enabled
Use this mode when the external system requires a valid and accessible media link for every event.
- Execution Model: Synchronous Mode (Sync)
- ANSVIS waits for media upload to complete.
- HTTP event is sent only after successful upload.
- If upload fails, the event is not sent.
- Synchronous (Sync) mode may increase event latency.
- This setting applies only when using cloud media upload (image/video).
- Does not affect Base64 image mode.
Send Test Trigger
After finishing HTTP configuration, you can use the Send Test Trigger button to sends sample event data to the configured URL
This will helps verify: Connectivity, Authentication, Payload compatibility

Debug Mode
If enabled:
- Logs HTTP request details.
- Logs server response.
- Useful for integration troubleshooting.
Should be disabled in production environments.